
A small greenery tree can bring the shape of a Christmas tree to a side table, a windowsill or a quiet corner of a room. The pot gives it a definite base, while short fir and pine pieces build a soft, tapering silhouette. The decoration works best after that silhouette is already clear.
This project binds cut greenery around a metal rod set in a terracotta pot. The lower branches make the widest part of the tree; shorter pieces narrow the shape toward the tip. Red ornaments lead the colour scheme, white details lighten it, and a few curved brown branches connect the tree visually to its pot.
Prepare the support and materials
Set out a terracotta pot with a firm, upright metal rod secured in plaster, cut greenery, binding wire on a reel, wire cutters and secateurs. The rod in this tree is approximately 8 mm thick. Its size and the base need to suit the actual height and weight of your tree.

Start with the pot and plaster base prepared. Construction plaster is used here; allow it to set as directed before pulling binding wire against the rod.

For the green body, the maker combines dense fir with pine in different textures. Prepare shorter pieces for a small tree, with fuller branches for the lower area and finer pieces for the top. For the finish shown, gather red and white baubles, decorative berry sprigs, red-and-white candy-shaped ornaments, stars, white decorative branches and a fine red wrapping wire.
1. Cut the greenery before you begin binding
Turn a fir branch over and cut its side shoots from the back. Use the attractive central sections as well, keeping the cut ends where they can be hidden inside the tree. Sort the pieces loosely by size so that you can reach the longer ones first.
Think of the eventual outline while you cut. A large branch can be useful near the pot but too broad near the tip. Keep a few smaller pieces aside to fill shallow spots later. Different textures can sit together, but they need to be distributed through the tree rather than separated into two unrelated halves.

2. Bind the broad lower layer to the rod
Anchor the reel wire near the bottom of the rod. Gather a small group of longer branches and bind their stems firmly to it. In this version, the greenery begins close to the pot, so the support is concealed as the tree develops.
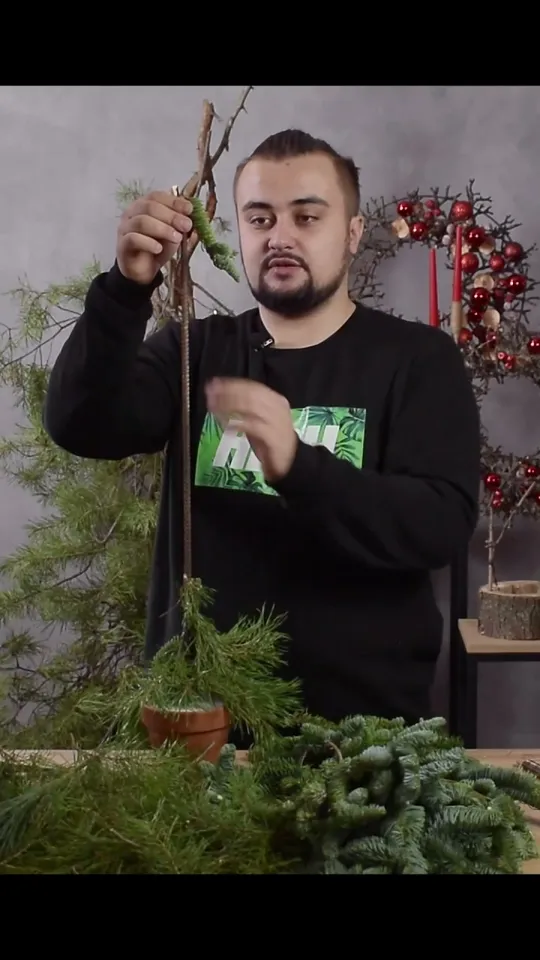
Continue around the support, changing your viewing angle as you work. Keep the attractive face of the fir toward the outside. Bind each group securely and hide the wire beneath the next greenery. If you choose to leave a visible trunk instead, the exposed plaster at the pot opening will need its own neat covering.
3. Narrow the layers toward the tip
Work upward with progressively smaller pieces. The front view should show a clear triangle, while turning the pot should reveal a coherent cone. Look for sudden changes in width, a hollow side or a heavy clump that pushes the outline away from the rod.
Alternate the greenery through the whole height. Short, dense fir pieces can give the surface body, while the longer pine needles soften it. Do not let the upper part become as broad as the base; leave room for the taper to do its work.

4. Trim the outline and fill shallow areas
Once the rod is covered, trim branch tips that project beyond the intended outline. If a section is too thin, bind a small extra group of greenery together and add it where the gap appears. More decoration is not a substitute for a missing part of the green form.
Stand back and compare the tree with the pot. The tree and pot can have different height relationships, depending on the intended design. Judge the finished foliage shape, rather than the bare support, and keep the base steady as you turn it.
5. Choose a leading colour and arrange groups
The photographed tree uses more red than white. Candy-shaped red-and-white details connect the two colours, while white baubles and decorative branches provide smaller accents. You can change the palette, but choose which colour will lead before you begin placing the ornaments.

Place larger pieces in the broader lower area and smaller pieces higher up. Work in small groups rather than scattering every ornament at equal intervals. Compare a group with the amount of greenery around it: a cluster that suits the base may overwhelm the tip.
6. Fix the ornaments without burying them
For a bauble with a suitable neck, wrap wire around that neck and twist the two ends together. Secure the fixing to the greenery so that the wire disappears but the bauble remains visible. Decorative sprigs that already have wire stems can be divided into smaller groups and positioned through the tree.
The maker favours wire for the main decoration and discusses careful use of hot glue as another method. The finished surface should show the chosen materials, with the fixings concealed. Keep checking the tree from several sides rather than finishing only the front.
7. Finish the point and the lighter lines
Wrap the exposed tip neatly with fine red bullion wire, as in the example, or with a thread that suits your own palette. Cover the mechanics and keep the point narrow. A large topper would change the slender finish shown here.

Add the white decorative branches in short sections after the main ornaments. A few curved brown twigs soften the needle texture and repeat the colour of the terracotta pot. Keep them light enough for the green outline to remain easy to see.
Check the finished tree in its intended place
Inspect the lower edge, the top and the back for exposed wire, empty patches or loose ornaments. Check that the pot and rod remain steady. This is a cut-greenery design bound to a support; inspect the branches and fixings again while it is on display.
Compare greenery, moss and more open tree constructions before choosing your next project.
For a smooth, moss-covered surface with a different base, make the moss Christmas tree.